Showing posts with label DIY. Show all posts

Monday, May 13, 2013

How to Use Pinterest to Improve Blog Traffic

 photo HowToUsePinterest2_zpsab5c0165.jpg

As Pinterest has grown in users, the company has grown as well. There are so many ways to get your business or blog known simply by using Pinterest. For example, when I first started The Blissful Bee last April, I have to thank Pinterest for getting my name out there. When I blogged about my DIY factory cart table, people pinned that project over 3,000 times! My DIY drum light fixture has been pinned over 5,000 times! It's pretty crazy to think about, but very exiting as well. Over the two years I have been on Pinterest, I have somehow gained 2,600 followers! I do have to admit that I might be on Pinterest a little too much at times, but I really do believe it has helped my blog grow. 

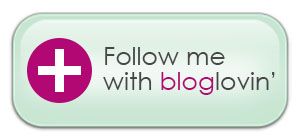
Today I want to share a few of my favorite tips for using Pinterest. My first tip is to ALWAYS include a "Pin it" button somewhere in your post. Whether it's a button that is placed above the image, at the top of the post, or hovering over the image, they will all work wonders. Simply by having that button somewhere on the post will remind your viewers to pin your project. Including a "follow me" button in your sidebar is another great way to remind your readers to follow you. As you can see, I designed a custom button that matches my blog, but Pinterest offers a "follow me" button as well (as seen in the widget builder below).

I also include a watermark of my website URL on each image I post. That way when it's pinned on Pinterest, people will hopefully start to recognize your blog name even if they don't repin your stuff. 

As you can see, Pinterest has given us an easy to use Widget Builder (pictured below). It gives you a few different options to choose from, but a really fun option is the Board Widget and Profile Widget. You can also add your "pin it" button and "follow" button here as well. The hover button is a little more difficult to add because you have to add additional HTML coding. This cannot be done through the Pinterest website, but you can see a tutorial on adding the hover button [here].

 photo 2013-05-13121314pm_zps1adf9968.png

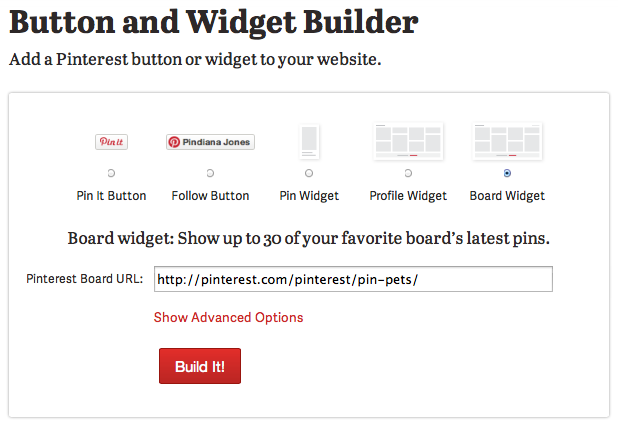
To build your own Widget Builder, click [here].

Another helpful tip is to include your blog name on your account. For example, my Pinterest name is Amy@TheBlissfulBee. Instead of using my first and last name, my first name is Amy, and my last name is "@TheBlissfulBee". This is also a great way to get your name out there. To make this change, go to your profile, and click on the pencil icon at the bottom right corner. There, you can change your user name and also write a short description of yourself. I have also included my blog website in this description.

Here are a few of my favorite boards on my Pinterest account. If you like what you see, make sure to follow me!


I also try to pin my project after I have published my post. For a while, I felt silly pinning my own projects, but I feel like it really does lead new readers to my blog. I don't do it with every post, but I will on some of my more important ones. If I feel like it's something a reader will really enjoy or learn from, I will pin it. I hope that some of my words of wisdom will help you all in your Pinterest journey! Let me know if you have any further questions and I will try to help answer them:)


Follow on Bloglovin


Who I'm linking up with:


Monday, April 22, 2013

DIY Fabric Inserts for Shelving


 photo ShelvingMontage_zps84130fb6.jpg

So the other day I had this sudden urge to get out of the house and find me a project to create! I hadn't had one in a while and I was just itching to create something really amazing. For a while, I had been eyeing those custom wallpapered bookshelves that you see everywhere, but just never got around to figuring out how to construct one on a budget with the bookshelves I already had. The idea kind of just fell into the background and didn't resurface until last week.

The shelves I have are from Target and aren't what you call... the highest of quality. They are the kind of shelving that you put together yourself, and the backing is not the prettiest. It's that terrible cardboard that is covered in a fake wood veneer. Not noticeable in general, but it bothered me like crazy just knowing it was there. Thankfully I was able to come up with a high end look for literally JUST $40!!! Since I already had the shelves, all I had to buy was the fabric and cardboard. Ain't too shabby if you ask me;)


 photo before_after_zps12e4aa92.jpg


As you can see, above you will find the before and after. I really wanted something that made a statement and was bright and graphic. My goal was to decrease the decor (aka clutter - says my husband) and give the bookshelves a more cohesive design. Focusing less on the decoration on each shelf, and more on the overall look of the design. Below is my tutorial on creating these wonderful fabric inserts for yourself!

 photo HowTo_Shelving_zpscfc30cd8.jpg


Supplies:
1. Book Shelves from Target (on sale) - $80 or $160 for both
2. Cardboard $10
3. Fabric - about 6 yards (on clearance HALF off $9.99) - Total of $30
4. Scissors and/or exacto knife
5. Glue gun and hot glue


Step by Step:
1. Collect all of your supplies.
2. Measure each shelf's height and width. Draw out those measurements onto your cardboard and cut.
3. Pop in your insert into the appropriate shelf to make sure it fits correctly. Adjust if needed. My inserts fit tightly into the back of the bookshelf so they will stay in place. I might velcro them to the back later on down the road, but for now, they stay in place just fine.
4. Take out your insert and place over fabric. Cut fabric about 2 inches extra on each side of the cardboard so you have room to wrap around the cardboard. Once your fabric is cut, flip over the cardboard, tightly wrap the fabric around and begin gluing the fabric to the cardboard. Make sure to keep the fabric tight during the gluing process so there won't be any wrinkles on the front of the panel. Once you are done gluing, flip the panel back around and insert into the book shelf. 

As you can see, this project is VERY easy and extremely affordable to create. At only $40, it ended up becoming one of my favorite DIY projects over these past few months. Such a big bang for your buck!


 photo ShelvingMontage2_zpscf22f57d.jpg

 photo ShelvingMontage3_zps181b7d28.jpg

 photo ShelvingMontage4_zps2e439542.jpg

 photo ShelvingMontage5_zps6729616e.jpg

 photo ShelvingMontage6_zps86f5e0ea.jpg

 photo ShelvingMontage7_zpsa7f8a2b7.jpg


And just a quick reminder that Google Friend Connect will be GOING AWAY on July 1st, so please please please follow along with Bloglovin. It is SUCH a great blog reader, and I even like it better than GFC! Who knew?? Anyways, you can follow along from the link below, or see my sidebar to click on the button. It took me 2 seconds to sign up for FREE and it literally transferred ALL of my blogs over in about 30 seconds. Can't get much better than that, right??

Follow on Bloglovin


Wednesday, April 3, 2013

Photoshop in Photography

 photo photoshop_banner_zps5d7a2f06.jpg

Howdy folks! So today I am back {yet again} with a photography post. I want to share with everyone one of the many tricks I use in my photography in post production. It's one of my favorite tricks, and although it's quite time consuming, it really makes a world of a difference - It's the good ole paintbrush tool in photoshop!

Before I really got into photography a few years ago, I always knew it was important to use photoshop in post production, but I didn't always do it. Mainly because I didn't have clients at the time and I really had no reason to test it out. Now that I have been back into the world of photography and offering my services, I have really embraced the art of photoshop and all its glory. It really is a FABULOUS tool.

Today's tip is about airbrushing your photos. Everyone wants to look better in their photographs, right?? Well using the paint brush tool in photoshop is a great way of evening your skin tone and creating a beautiful glow that you otherwise might not have with the original file. With adults, it also makes a world of a difference with dark circles under the eyes, wrinkles, harsh shadows etc.

Here is a brief tutorial on how to airbrush your photo:

1. Open your photo into Photoshop
2. Use the eye dropper tool to pick up a similar skin tone color that you will use to airbrush your desired area.
3. Choose your brush tool (with the color you have just picked up) and give it some opacity. Make sure the brush has 0% hardness so the airbrushing will be nice and smooth.
4. Create a new layer on top of the photo and start airbrushing over your desired areas.
5. Choose your eraser tool (0% hardness & about 35% opacity... or less) and start erasing away areas of the new airbrushed layer that might have gone overboard.
6. Repeat steps 4 & 5 until you get your desired look. I end up creating many layers and erasing and adding to all of them until I am happy with the outcome.

Here are some of my process photos. As you can see, the original file is on the left, and my process continues on to the right. The slightest change really does make a world of a difference! Especially in sweet newborn sessions:)

 photo 1234_zps4b368445.jpg

The before photo is on the left and the final result is on the right.

 photo 12_zps96a15d26.jpg

Here is another example of my process:

 photo 123_zpsa70a373f.jpg

And as you can see, the before photo is on the top and the after is below.

 photo before_after_zps335dd39e.jpg

These newborn examples really show how you can erase that crinkled forehead or unwanted shadow. Before I ever start airbrushing, I always make sure to observe the photo first. I want to make sure I keep the highlights true to the original. Otherwise it will look unnatural. To see more from this newborn session, click through {HERE}

 photo button_zpsfedcb5ca.jpg

And just a quick reminder that Google Friend Connect will be GOING AWAY on July 1st, so please please please follow along with Bloglovin. It is SUCH a great blog reader, and I even like it better than GFC! Who knew?? Anyways, you can follow along from the link below, or see my sidebar to click on the button. It took me 2 seconds to sign up for FREE and it literally transferred ALL of my blogs over in about 30 seconds. Can't get much better than that, right??


Who I'm linking up with:

Friday, March 22, 2013

DIY Vintage Photography Props


 photo props_montage_zpscad5a1ed.jpg

Today I want to share with you some DIY photography props that I have been making lately. They might look rather complicated, but I promise you, they aren't! 

I finally got my new lens for my camera and I am SO excited to use it on my newborn session I have coming up on Sunday. In my excitement, I have been looking into different props to prepare for the shoot. I have been very inspired by vintage props lately and wanted to bring in some of that in my upcoming session. Specifically, vintage headpieces. After looking at some Etsy options, I quickly realized that this DIYer could TOTALLY make them on her own. So what did I do? Made a Joanns trip of course! 

I was anticipating these projects to be much more time intensive, but thankfully they weren't. When I walked into the store, I basically just walked around for an hour looking for anything vintage looking. I picked up a few hair clips from the jewelry isle, picked up a few flower clips from the "fake flower" isle, went to the "mask making" isle to find some nice feathers, and what do ya know? By the end of the trip I ended up with enough materials to make multiple hair pieces. My favorite find was the vintage inspired tule I used for the headpiece (seen above). Since most of the pieces I found already had clips attached, I didn't even have to use any glue to piece these together. And the best part?? I can mix and match as well. Another favorite find was the lace I used to create a little princess crown. I might have to use some fabric hardener to stiffen the lace a bit, but so far the lace stands up rather straight on its own. Can't wait to test out some of these pieces at my next photo shoot! Wish me luck:)

To check out my photography site, visit {{ www.creativecottagephotography.com }}

 photo props_montage2_zps53e4cf3b.jpg

 photo props_montage3_zpsf81e946d.jpg

 photo props_montage4_zps667387f5.jpg

 photo props_montage5_zps6d52f3aa.jpg

 photo props_montage6_zps925e34bc.jpg

Wednesday, February 6, 2013

Mirror Makeover

Today I want to share another one of my furniture makeovers for the new house. I forgot to take a before picture, but as you can see below, I took a snap shot mid-project! This mirror has seen a few different paint colors in its day - let me tell you! It all started somewhere in the 80's in a very gaudy gold finish. Now don't get me wrong, I love me some gold, but this was a bit overbearing. This mirror actually sat in my parents formal living room through the 80's and 90's and disappeared sometime after that. Yes, it was time for it to be hidden away in a closet and we should all be thankful for that! 

Ok now fast forward about a decade... Once I graduated college, I had no money, no job and NO furniture! So whats a girl to do? RAID her parents house;) That's when I found this old gem... well soon-to-be gem. She was still gold and still quite flashy. Not a problem for this gal though! 10 minutes later she was on my parents kitchen floor and painted black. Perfect! New mirror?? Check!

After many years of this mirror being used in its fabulous black paint color, I thought it was time for a change. See... back in the day I had this theory that you could fix any piece of old furniture with some black paint. So, naturally I pretty much painted everything black. Well... after a while, I ended up with a bunch of black furniture. With our new house, I wanted to brighten things up a bit. I went through many different color options for the new mirror. They varied from coral, to sea foam blue, to mint green and so on. Well folks, I ended up not choosing ANY of those colors and went with white. Boring?? I sure don't think so! It was such a drastic change and really lightened up the space. What do you think?


 photo before_zps4da6fc32.jpg


 photo mirror_after_zpsf2025bd5.jpg


 photo mirror_after3_zps3c6020bb.jpg


 photo mirror_after2_zpsbaea8dc9.jpg


 photo mirror_after4_zps85a50015.jpg


 photo mirror_after5_zps5e6f0095.jpg


Friday, January 18, 2013

Hide-A-Way Kitty Litter Box


So I want to start out with saying that I am completely aware that by posting about a {Hide-A-Way kitty litter box} that I am knowingly walking into "crazy cat lady" territory... Yupp. It just happened. I will say though that I do think this post could be quite useful for any cat owners who might want to live stylishly AND have an indoor cat. Yes people, it's possible. Let me show you how.

Since we have moved, we had to find a new home for our sweet kitty {Bailey's} litter box. We don't have a large laundry room like we did in the previous house, so I had to get creative! Unfortunately the only place we were able to put her "bathroom" was in our kitchen. EW, right?!? Well don't you fret, because I've got a solution.

Since we adopted little miss Bailey back in May, we bought the best little purchase EVER from good ole Wal-Mart. It's a litter box that represents a piece of furniture compete with an adorable little door that I can change out her "business" and she can walk in and out to... well... ya know... DO her business;) At only $49, it is one of our best buys yet! It hides 98% of the smell, and at the same time hides all that nasty stuff we don't want to look at. 


 photo 2013-01-18115824am_zpsee7e79a4.png
You can find it {HERE} at walmart.com

So now you might be wondering how to recreate the rest of Bailey's "Potty Mansion" as I like to call it. Well it's quite easy and I am here to show you how. All is takes is just a few items and a few short steps. 


 photo whatyouwillneed_zpsb33cbd18.jpg

You first need to start off with some sort of decorative table that is open underneath. The table I used is something my Dad and I built years ago out of an old cabinet door. But no custom build is needed for this project - anything that has an open bottom will work. You also don't need to have the $50 litter house from wal-mart - it's great to have to hide the smell, but it's not needed. I love using it because with the door on the kitty house, along with the curtain on my tutorial, there is NO smell at all. It's awesome.

Moving on! Basically what you need to do first is measure how wide your table is from leg to leg. Once you know your width, you can then purchase your spring rod - I found mine at target. I also purchased my curtain panel from Target as well. Next, measure how long you will need your curtain to hang down and cut your length about 3 inches longer than where it will hit the ground. (you will be "iron hemming" the panel, so you need extra fabric to fold under.) Once you have the curtain cut to the correct length, you will then "iron hem" your curtains to the exact length you previously measured. I found my iron-on adhesive tape at Joann's for like $2. The "ultra hold" is what the lady recommended at Joann's and it worked great! After my curtain panel was all hemmed up, I fed it through the spring rod. Now all that's left is to install it along the front of the table. And since we're using a spring rod, it requires... well... no installation! Just put in place, and your good to go! 

You can also place the curtains along the sides of the table, but I haven't found a need to yet. My table is placed in my kitchen where you don't see the sides or back, so it works out nicely. I also thought I might have to leave the curtain partially open for Bailey to know where to go to the bathroom, but luckily I was wrong. Turns out cats are pretty smart and she simply slips right through the small opening of the curtain while keeping it completely closed. Yippee! 


 photo litterboxhouse5_zps81cac575.jpg


 photo litterboxhouse2_zpsbd28bc83.jpg


 photo litterboxhouse3_zps1b7318cd.jpg


 photo litterboxhouse4_zpsc6c0ac16.jpg


 photo Bailey_zps2183f46c.jpg


 photo litterboxhouse_zpse5c65a1b.jpg


So I hope everyone enjoyed my first tutorial from the NEW house! We are loving it so far and I have so so many more fun posts to come. 


Saturday, September 22, 2012

DIY Lamp Makeover

About 2 weeks ago I broke my absolute favorite lamp EVER. It was my green glass blown lamp that I bragged about in my {Pottery Barn Copycat Post} that I bought from Walmart a few years back. I was so devastated and SO mad at myself. I actually had 2 of them, so I still have one left, but they were a pair, and that was my favorite part:( Thankfully, I found a new life for it's remaining parts! 

For a while now, I have had a decorative seagrass piece that I recently wanted to transform into a lamp. I really didn't feel like buying a lamp/light kit, so I just never did anything with it. Well... after breaking my favorite lamp, I now had the perfect lamp guts to work with. Here was my process:


Thankfully, I already had the lamp shade from a previous lamp, so the odd oval shape wasn't a problem.  Below is my verbal attempt at explaining how I configured everything together:

Steps:

1. Take apart an old lamp by first removing the bottom felt lining.

2. You will then see the wiring and will unscrew the bolt that is holding everything in place. 

3. In my case, I had to tear apart the cheap metal that my cord was encased in. I needed to pull my cord through, but the hole was too large for the plug to fit through. That is why I had to rip apart the metal. This part was surprisingly easy since it was a cheap lamp from walmart:)

4. Pull the cord through the base and take away any parts you don't think you will need for your particular transformation. This was a trial and error task for me!

5. Now we are down to our basics. I then pulled my wiring through my wicker decorative piece (aka my new lamp base) through the bottom.  I pushed it through the top opening of my wicker piece.

6. The cord simply feeds out the back of the lamp (so it wobbles a bit - but barely!) And the top part of the lamp peeps out of the top - ready for a light bulb and a shade!

7. Place your shade on your new lamp, and your done!


Neat huh?? Hope y'all enjoyed my little lamp makeover:)