
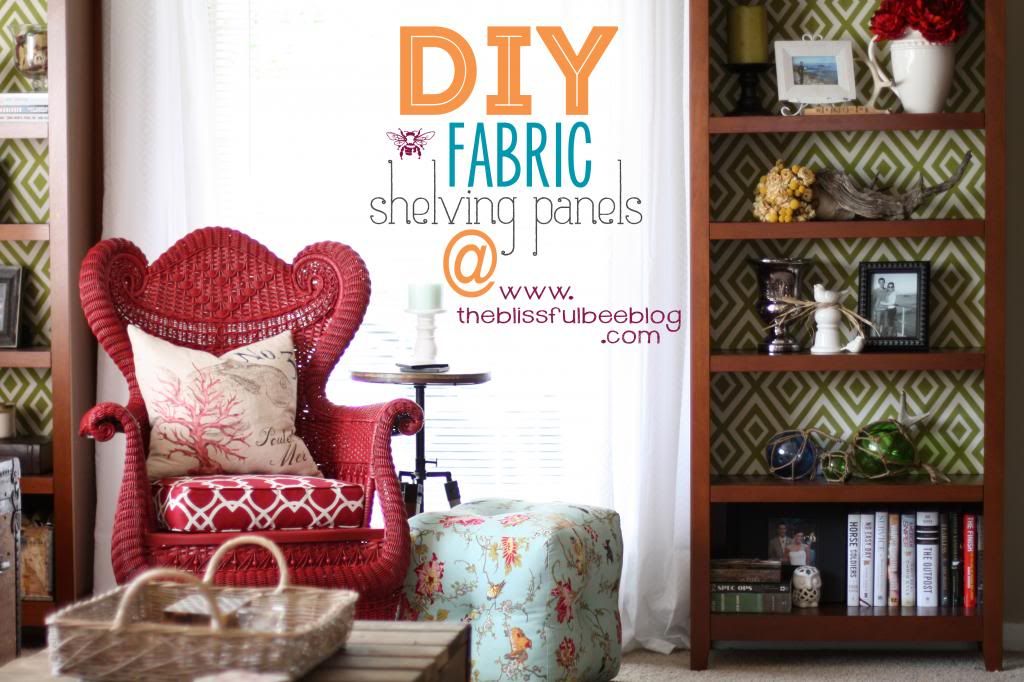
So the other day I had this sudden urge to get out of the house and find me a project to create! I hadn't had one in a while and I was just itching to create something really amazing. For a while, I had been eyeing those custom wallpapered bookshelves that you see everywhere, but just never got around to figuring out how to construct one on a budget with the bookshelves I already had. The idea kind of just fell into the background and didn't resurface until last week.
The shelves I have are from Target and aren't what you call... the highest of quality. They are the kind of shelving that you put together yourself, and the backing is not the prettiest. It's that terrible cardboard that is covered in a fake wood veneer. Not noticeable in general, but it bothered me like crazy just knowing it was there. Thankfully I was able to come up with a high end look for literally JUST $40!!! Since I already had the shelves, all I had to buy was the fabric and cardboard. Ain't too shabby if you ask me;)

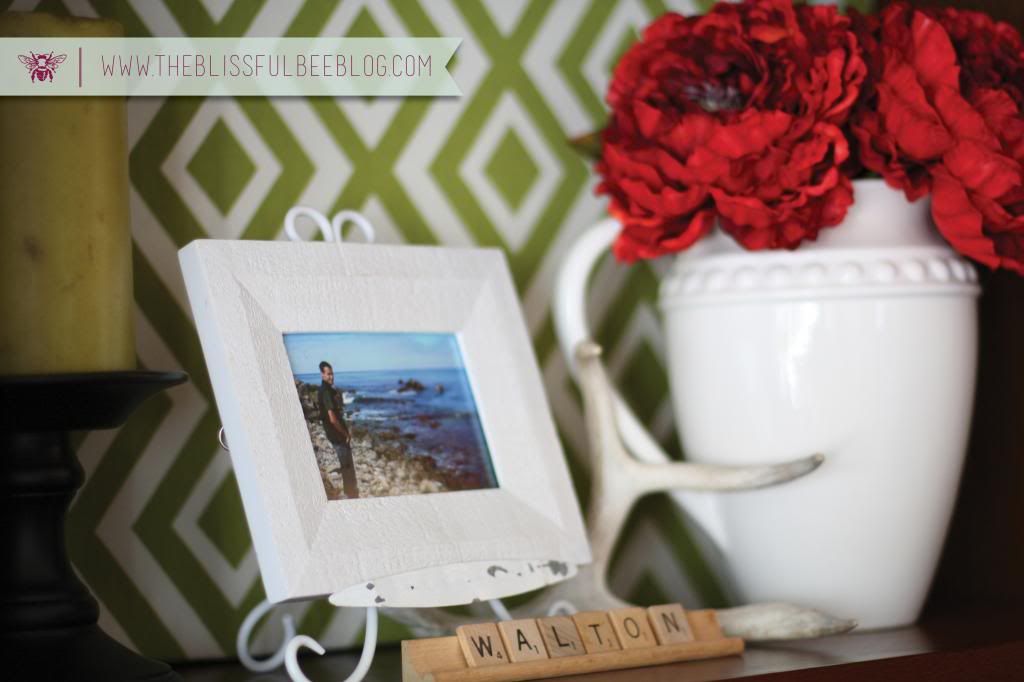
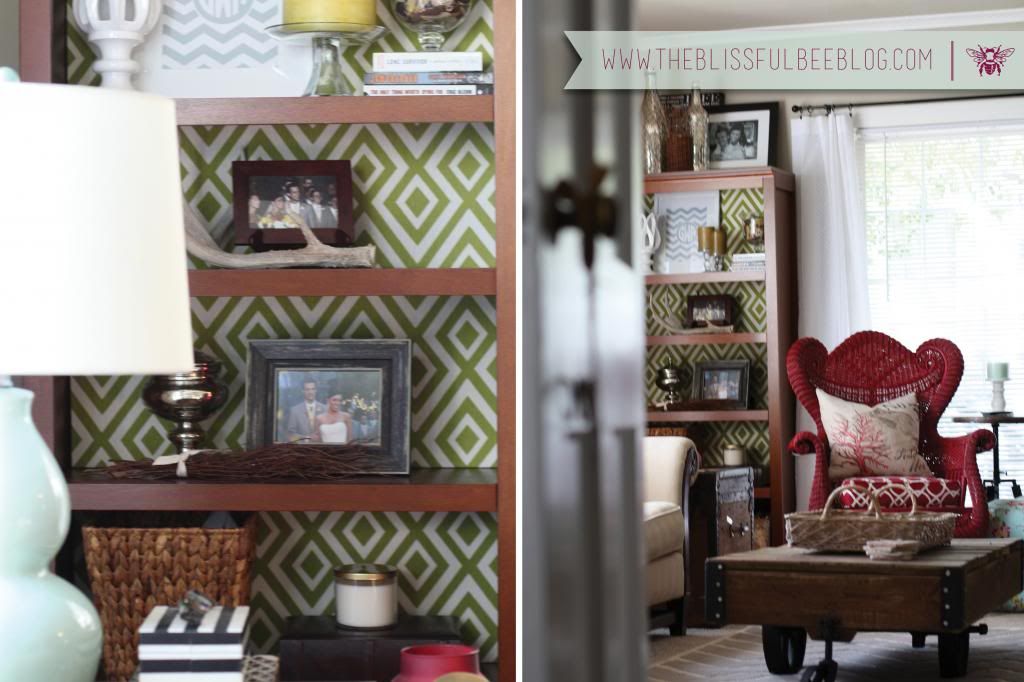
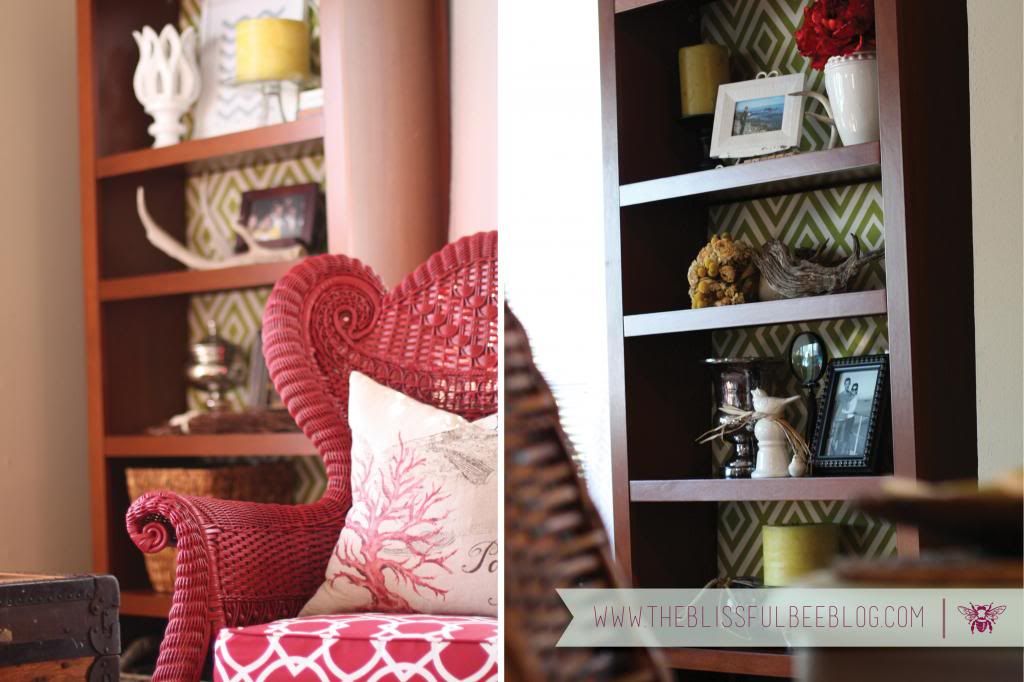
As you can see, above you will find the before and after. I really wanted something that made a statement and was bright and graphic. My goal was to decrease the decor (aka clutter - says my husband) and give the bookshelves a more cohesive design. Focusing less on the decoration on each shelf, and more on the overall look of the design. Below is my tutorial on creating these wonderful fabric inserts for yourself!

Supplies:
1. Book Shelves from Target (on sale) - $80 or $160 for both
2. Cardboard $10
3. Fabric - about 6 yards (on clearance HALF off $9.99) - Total of $30
4. Scissors and/or exacto knife
5. Glue gun and hot glue
Step by Step:
1. Collect all of your supplies.
2. Measure each shelf's height and width. Draw out those measurements onto your cardboard and cut.
3. Pop in your insert into the appropriate shelf to make sure it fits correctly. Adjust if needed. My inserts fit tightly into the back of the bookshelf so they will stay in place. I might velcro them to the back later on down the road, but for now, they stay in place just fine.
4. Take out your insert and place over fabric. Cut fabric about 2 inches extra on each side of the cardboard so you have room to wrap around the cardboard. Once your fabric is cut, flip over the cardboard, tightly wrap the fabric around and begin gluing the fabric to the cardboard. Make sure to keep the fabric tight during the gluing process so there won't be any wrinkles on the front of the panel. Once you are done gluing, flip the panel back around and insert into the book shelf.
As you can see, this project is VERY easy and extremely affordable to create. At only $40, it ended up becoming one of my favorite DIY projects over these past few months. Such a big bang for your buck!


And just a quick reminder that Google Friend Connect will be GOING AWAY on July 1st, so please please please follow along with Bloglovin. It is SUCH a great blog reader, and I even like it better than GFC! Who knew?? Anyways, you can follow along from the link below, or see my sidebar to click on the button. It took me 2 seconds to sign up for FREE and it literally transferred ALL of my blogs over in about 30 seconds. Can't get much better than that, right??


Who I'm linking up with:
Blooming Homestead
Home Stories A to Z
Kammy's Korner
TwelveOeight
My Uncommon Slice of Suburbia
A Diamond in the Stuff
Better with Age
Coastal Charm
Elizabeth & Co.
Not Just a Housewife
Primp
Suburbs Mama
Savvy Southern Style
All Things with a Purpose
I Gotta Create
A Stroll Thru Life
Shabby Art Boutique
Funky Junk Interiors
Homemaker on a Dime
Creatively Living
Sumo's Sweet Stuff
DIY Showoff
Cedar Hill Ranch
Looks awesome Amy. Love the fabric you picked. Your kitty is so cute too and reminds me of my Harry!
ReplyDeleteWow, amazing! I love this! I’d love it if you could link this up to our party, Give Me The Goods Monday! {1 party, 5 blogs}
ReplyDeletehttp://www.somuchbetterwithage.com/2013/04/give-me-goods-party-5.html
Have a great week!
Jamie @ somuchbetterwithage.com
PS: I'm a bloglovin follower now ;)
It look awesome!! I have a similar bookshelf and it totally needs a facelift! I'm like you, I need to complete a project soon!
ReplyDeleteJenny from diywithjenandb.blogspot.com
ah HAAAAA... cardboard! Good thinking! I'm SO GLAD you linked this up and I saw this before I attempted my own because I wouldn't have done that. Phew! It looks AWESOME and I also love your photos and professional looking blog! Oh, and I can't leave before mentioned how beautiful the cat is. Love me some furry felines!!
ReplyDeletewow!! So impressed!! Love everything about your blog!! Following along with BlogLovin! :) Have a wonderful week!
ReplyDeleteIt looks amazing. Great idea. I love your fabric choice too. I would love for you to link up to my Inspire Me party that is ongoing. This is gorgeous and great tutorial.
ReplyDeletehttp://www.astrollthrulife.net/2013/04/161th-inspire-me-tue-frenchyfarmhouse.html
Hugs, Marty
I did beadboard in mine, but your fabric is just so clever and pretty. Thanks for linking up, I hope to see you next week too. Hugs, Marty
ReplyDeleteI love how fabric looks inside a bookshelf. It is a project I keep putting aside. Your look so good! I love the fabric choice! Thank you so much for linking up this week! Hope you can join the party again.
ReplyDeleteI love, love, love this! I did something similar, except painted a grain stripe on my fabric. I love the pattern you chose! So glad you linked up to Give Me The Goods Monday! Can't wait to see what goods you bring next week! Hope you have a great weekend! Jenna @ Rain on a Tin Roof
ReplyDeleteOk...I am a little in love with these! The fabric choice is absolutely perfect! Made those generic bookcases look WAY expensive!! Thanks for sharing at MOnday Funday!;) Bonnie @ Uncommon Designs!
ReplyDeleteI just did something similar with wrapping paper. LOVE how yours turned out! I'm a new follower. :)
ReplyDeleteStunning Amy, I LOVE It! Your whole space is gorgeous, I love how you use and mix colour and pattern... I really love your style!!
ReplyDeleteKrista @thehappyhousie
Visiting from Monday Funday. I'd like to invite you to my Friday Flash Blog, where you can share your best blog entry of the week! The party goes on ALL weekend at thejennyevolution.com. And who knows, you may just get featured next week.
ReplyDeleteJennifer
thejennyevolution.com
This was one of our favorite projects this week at our Monday Funday link party! We will be featuring it tomorrow! Thanks so much for linking up!
ReplyDeleteTake care,
Trish
Okay um...... cutie cute cute!!! Great pictures too. I'm excited to browse through your blog!
ReplyDeleteA new fan....
Brittany
www.leopardandplaid.com
Love these shelves!! Great blog
ReplyDeleteADORE!! Great work! I'm loving your blog!! I'm thinking we just may need to partner up sometime in the near future! xox
ReplyDeletewww.MyMommyStyle.com
This is awesome! We are getting ready to do this to a Billy bookcase for my daughter and I can't wait.
ReplyDeleteThis is a fantastic project! Would you consider linking this up at my Pinworthy Projects Party? I hope to see you there!
Would you be willing to share your fabric source?
ReplyDeleteGorgeous, this just adds such a fun pop of pattern and color. Love it. :)
ReplyDelete