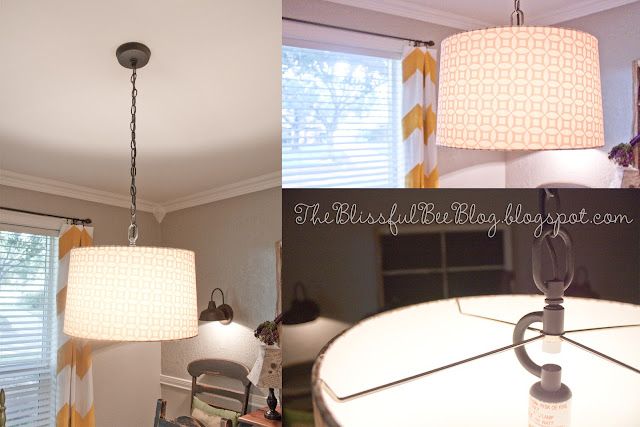
{DIY Hanging Drum Light Fixture}

Below is what we had hanging over our table before. It doesn't look so bad in the picture, but I think it's because you can't really tell what it looks like. I was never too happy with the way it looked in the room and always wanted something much lighter and brighter.
I had been on the lookout for a {replacement} option for this light fixture for quite some time, but a lot of my options were just too expensive. Since there was no real need to replace the light, I really didn't want to spend a lot of money on a replacement. Rewind... the hubby didn't want to spend ANY money on a replacement... so we came to a compromise. The other day I stopped into Garden Ridge while I was running errands. I wondered down the lamp isle and one of the lamp shades caught my eye. It's a shade they have carried for a while now, and I had seen it before and always liked it. I just never had a lamp large enough for it to fit. But this time I knew exactly what I could use it for. My new fixture for over our table!! It was just the perfect size too! I was a bit worried it might be too small, but it ended up being just the right size. And it was only $19.00! Now that's a price I can handle!
To be able to hang the shade, we needed a light kit. We found ours at Lowes for maybe around $15.00. This is actually meant to plug into the wall, so we had to modify it a bit. Just cut it off however long you need it to hang from the ceiling. You'll see below that the plug and switch is what we cut off. Then split and connect the wires as if you would a normal hanging light.
What you will need:
- Lamp Shade
- Light conversion kit
- Chain
- Spray Paint (I used a combo of black textured paint and black matte paint)
Step by Step:
1. Take down your old light fixture and keep it close by. You might need to use some of its parts for the new light.
3. Once it's all dry, thread your cord through the chain and start piecing together the hardware.
4. Screw on the shade onto the converter.
* We actually had to use two pieces of hardware from our old chandelier. It was the top piece and bottom piece that connected the chain. By using these two pieces, there would be no weight put on the actual cord. The weight is now all on the chain instead.
So what do y'all think? It's a fun little change, and only about $40 for the entire thing. Hope y'all enjoyed!!


Looks great!!
ReplyDeleteSo pretty Amy!!! It looks completely designer! Love it! xo
ReplyDeleteI love drum shades and the pattern you chose! So cute!
ReplyDeleteIt's a very pretty shade. I love your center pieces too! We'd love it if you'd share this at our Home is Where the Heart is! http://www.homesteadsimple.com/home-is-where-the-heart-is-link-it-up-wednesdays-1/
ReplyDeleteand any other posts you'd like to share that have to do with homesteading and homemaking!
It looks wonderful. I love changing up lighting and for such a great price. Now I'm walking around my house looking for a light to change out.
ReplyDeleteSusan
What an awesome post! You really have a chic and creative lamp! I would have never thought of that! Kudos to you for getting the perfect lampshade for your dining room!!!
ReplyDeleteThanks for sharing this at TUTORIALS TIP AND TIDBITS! Seriously, smart... and very upscale!
I love the photos and the post...Cool Colors too! i will be following your blog. I tend to be inspired by interior design, since I am an artist. Take a look at my NEW ART Blog...THX!!!!
ReplyDeleteWhat a fresh and modern update! Thanks for sharing the turorial!
ReplyDeleteHi Amy!
ReplyDeleteAlways love what you come up with. You have such a beautiful style. Wish you were on facebook so I could visit with you more... (hint hint)
Shannon :)
Love it, Amy! Something like this has been on my to-do list. Not quite ready yet but your tutorial is super helpful! I'm going to include a link back in this week's highlights! ;) Thanks so much for sharing!
ReplyDeleteIt looks great. I like the pattern on the shade.
ReplyDeleteLove this! Came over from HomeTalk. Pinning now :)
ReplyDeleteLove it! Such an improvement and I can't believe how inexpensive it was. Going to pin it for later reference.
ReplyDeleteThis is Melissa @ Daisy Mae Belle. I LOVE that light! The room is wonderful! I found you over at the AKA party!
ReplyDeleteOk I'm stopped in my tracks! I wanted a light fixture but now I can get my bamboo blinds and do this great idea! Adding this to our weekly household to do list!Thanks!!!!!
ReplyDeleteI love this! I'm really stumped though, I know you got the kit at Lowes, but I can't seem to find it on their website, do you happen to have any more info about the name? I've been searching for something like that!
ReplyDeleteGreat job! It looks great.
ReplyDeleteGreat job! It looks great.
ReplyDeleteI have an adorable Anthropologie lamp shade that no longer matches my bedroom and hideous entry way lighting. Thanks!
ReplyDeleteThis is such a great idea! I am so excited to use this for my craft room! What size shade did you use?
ReplyDelete