Showing posts with label lighting. Show all posts

Sunday, July 8, 2012

DIY Hanging {Drum} Light Fixture


{DIY Hanging Drum Light Fixture}


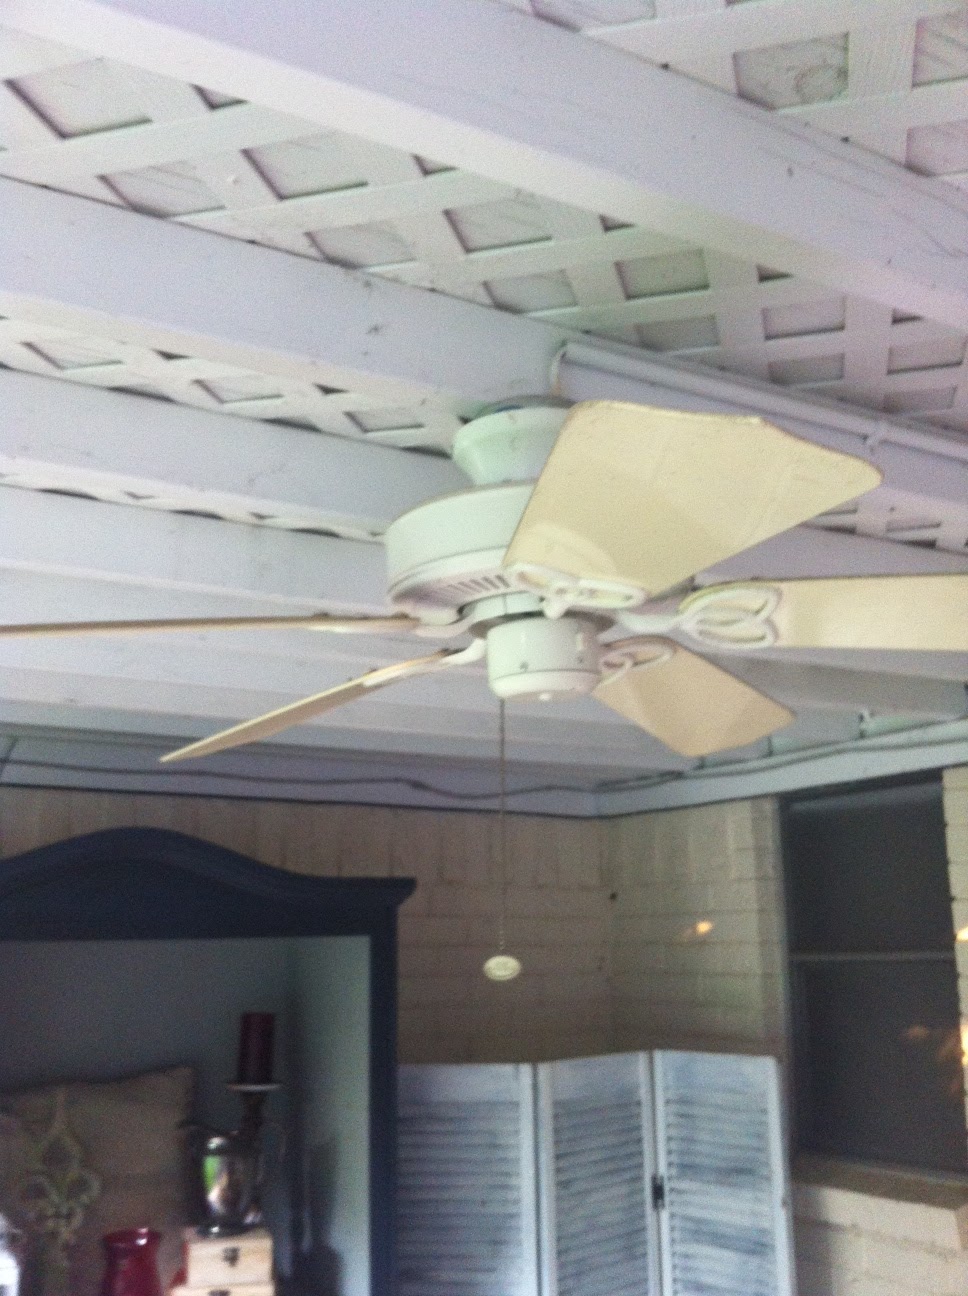
Below is what we had hanging over our table before. It doesn't look so bad in the picture, but I think it's because you can't really tell what it looks like. I was never too happy with the way it looked in the room and always wanted something much lighter and brighter.


I had been on the lookout for a {replacement} option for this light fixture for quite some time, but a lot of my options were just too expensive. Since there was no real need to replace the light, I really didn't want to spend a lot of money on a replacement. Rewind... the hubby didn't want to spend ANY money on a replacement... so we came to a compromise. The other day I stopped into Garden Ridge while I was running errands. I wondered down the lamp isle and one of the lamp shades caught my eye. It's a shade they have carried for a while now, and I had seen it before and always liked it. I just never had a lamp large enough for it to fit. But this time I knew exactly what I could use it for. My new fixture for over our table!! It was just the perfect size too! I was a bit worried it might be too small, but it ended up being just the right size. And it was only $19.00! Now that's a price I can handle!


To be able to hang the shade, we needed a light kit. We found ours at Lowes for maybe around $15.00. This is actually meant to plug into the wall, so we had to modify it a bit. Just cut it off however long you need it to hang from the ceiling. You'll see below that the plug and switch is what we cut off. Then split and connect the wires as if you would a normal hanging light.


What you will need:

- Lamp Shade
- Light conversion kit
- Chain
- Spray Paint (I used a combo of black textured paint and black matte paint)


Step by Step:

1. Take down your old light fixture and keep it close by. You might need to use some of its parts for the new light.

2. Spray paint all your hardware the same color. I also spray painted the cord from the light kit along with the little converter piece too.

3. Once it's all dry, thread your cord through the chain and start piecing together the hardware. 

4. Screw on the shade onto the converter.

*  We actually had to use two pieces of hardware from our old chandelier. It was the top piece and bottom piece that connected the chain. By using these two pieces, there would be no weight put on the actual cord. The weight is now all on the chain instead.


So what do y'all think? It's a fun little change, and only about $40 for the entire thing. Hope y'all enjoyed!!


Monday, July 2, 2012

Outdoor Lantern Light Fixture


For the past few weeks, I have been working on perfecting our back patio. There have been many {mini} projects going on, and this is the latest. It's our light fixture that hangs over our dining table:) We originally had a fan hanging over the table, but from the moment we moved in last September, I knew that thing had to go. Expecially once we added the dining table! It needed something to make the look complete, but it took me a while to figure out just what that was. I debated whether I wanted a candleabra, or an actual light. The light would attract bugs and be a lot harder to hang... And the candleabra I had my eye on was $70, so that wasn't going to work either. So on to plan C! 


Thankfully, one fine day I impulsively decided to accompany the hubs to a Lowes trip for a tool he needed for the pool. As I typically do, I got distracted in the wonderful world of Lowes and eventually ended up on the outdoor decor isle. That's when I saw it. The beauty that I had been looking for all along! She was just there, waiting for me to grab her off of the shelf! And what is that yellow tag I see? Could it be?? Clearance?? YESSS! Score for Amy!! I ran over, grabbed it, and knew exactly where it was going to go. It was totally meant to be:) And for only $24?? I couldn't even get it that cheap at Marshalls! And we all know how much I love Marshalls! I also hadn't seen a red one like this. Seriously people... this thing was meant for me:)

Now that we knew what fixture we were using, we walked on over to the rope/chain isle to see how we were going to hang this sucker. I knew I wanted to use some old textured rope, but was worried Lowes wouldn't carry anything like that. Well, to my surprise, they DID! I was shocked and so excited! A few weeks ago I saw an antique pulley at a local antique mall and fell in love. It included the beautiful rustic rope and the pulley along with it. It was pretty big though and also pretty pricey. I knew I couldn't use that specific one anywhere in our house, but kept the thought of it in the back of my mind. I really must have lucked out at Lowes that day because about 5 feet to the right of the rope was an entire wall of pullies and accessories. yayyy!!! They were all galvanized metal, so I knew I would have to paint them, but eh - no biggie. We grabbed the supplies we {thought} we needed and headed out. We actually ended up using less supplies than we thought, so that was nice. Too bad I spray painted them before we figured that out!

Here is my little tutorial:

What you will need:

- Hanging lantern of some sort
(make sure it's not too heavy depending on what you're hanging it from. We even considered breaking the glass out of ours, but didn't end up needing to.)
- Rope
- Pulley
- Hook to hang the rope from
- Textured brown or black spray paint (I used black)

Step by Step:

1. Find lantern (carefully break glass out of the lantern if it is too heavy. If the support beam can handle the full weight, don't worry about breaking out the glass. In some lanterns, the glass might not even be the heavy part, the metal/wood might be heavier - just depends on the lantern)

2. Spray paint your pulley and hook whatever color you would like, and wait for them to dry.

3. Test how low you want your lantern to hang. We have low{ish} ceilings on our back porch and I wanted the rope to show more than just a few inches. We actually had to cut off some of the handle of the lantern in order for more rope to hang. Does that kinda make sense? We wanted less handle to show, and more rope.

4. Take down whatever pre-existing light fixture may already be hanging there. In our case, we had a fan. We turned off the breaker (since our outdoor fans were live wires) and safely took down the fan. We capped off the existing live wire and tucked it safely away in an electrical box between the rafters on our ceiling.

5. Screw in the hook where you would like the new fixture to hang from. Make sure to screw it in all the way so there is no chance of it coming out.

6. Thread the rope through the pulley and hang the pulley from the hook. Then find your desired height of the rope/lantern, and knot the rope at the handle. If you are unhappy with the height of everything - no problem! Just untie the rope and try again. I just tied one knot because the weight of the lantern will hold the knot tightly in place. The rope is very textured and won't slip.

7. Sit back and enjoy:)


 Here are some of the process pictures!


 And here is the final product!


{And once more...}

Before:


After:


So what do y'all think?? Fun right! Much better than that old yucky fan! We also had a little helper throughout the project:) Little Bailey hates being left out, so she of course had to be involved... or at least she tried. Really not sure how she jams herself between those shutters, but she sure finds a way! Love that little girl:) Hope everyone had a great weekend - Happy early 4th of July! Look out for my {4th of July party} post later on in the week!


Adios!


Monday, April 16, 2012

An Antler Makeover

So for a while now I've been intrigued with antler-like objects. I think the rustic elements really are the reason why I'm so attracted to them. About a year ago, my hubby came home from a hunting trip with a nice little surprise on the stove. He was boiling a set of antlers from a deer he had killed that day. I wasn't sure how to feel about it because a.) he was boiling antlers in my kitchen! Gross!!!  b.) he killed bambi!!!  and c.) he was really proud of himself... so should I be proud of him??? ugh regardless - I couldn't do anything about bambi at this point so I had to move on... *tear* I will say this is probably where my creativity had to kick in because guess what - he wanted to mount this thing. I was still seriously grossed out and sad at this point, but I started brainstorming ways to make these antlers "rustic chic." I didn't have pinterest at the time, but below are a few images I recently pulled that were similar to my inspirations at the time:


After looking through rustic inspirations like these, I knew I would be able to easily mix the antler look into our home in a mix-matchy kind of way. This is also where I fell in love with the organic feel that these objects bring to a home. (Preferring faux antlers of course!) After a year or so of moving my hubby's "trophy antlers" around the house - trying to find them their proper home, they ended up in our new office. I'll give y'all a closeup pic once I post the office reveal. That will be coming soon!

Now here is where the REAL makeover comes into play. A few weeks into my antler craze, I had made another one of my frequent trips to Marshalls and found the ugliest/most amazing lamp ever. Prepare yourselves people. It looked like it came right out of a 1980's summer camp cabin or something. It was SO ugly that it was on clearence for $10. I just couldn't pass it up. Here is the before:


That was the shade... I shamefully just left it at the store. I mean hey, maybe someone else would really love it?? Here is the pic of the rest of it:


They were pretty terrible separately, so imagine them together. Scary! After my Marshalls trip, I walked on over to Target to pick up a simple black shade. I think I ended up finding this one for like $7.99 on clearance. (note: the shade isn't shiny, I just hadn't taken off the wrapping yet)


After taping off the parts I didn't want sprayed, it was time to get to work. With just about 2-3 coats of a matte white spray paint and a new shade, here is the after:


 And here is a close up:


So that's my antler makeover! Hope y'all enjoyed:) Some of these pics give you a little sneak peak of our updated entryway. I will be posting about that later in the week, so check back to see!


Happy Monday,